
On this page
Start each session with one main goal: levels, reset preparation, currency, a ticket or a specific equipment upgrade. A spot that is good for one goal may be poor for another.
Choose a useful spot
Check access, survival, kill pace and recovery cost. Move to harder monsters only when their benefit compensates for slower kills and extra supplies. Repeated deaths interrupt buffs, travel and pickup as well as experience gain.
A repeatable ten-minute comparison
- Empty unnecessary items from the bag and note your starting Zen and supplies.
- Use the same attack, buffs and Helper filters in the first spot.
- Hunt for ten minutes and note progress, useful drops, potion use and deaths.
- Repeat in the alternative spot with the same setup.
- Compare the result that matches your goal, not just the largest hit number.
This is a practical comparison method, not a promised drop rate. Rare drops need much longer observation, and a short unlucky session does not prove a reward is absent.
Match pickup to the goal
Collect the exact materials you need and enough tradeable items to support your costs. Keep inventory room for valuable drops. If the bag fills quickly, reduce low-value pickup or schedule shorter trips back to town.
Plan an equipment hunt
Search the boss directory by an item name. Open the relevant boss, check its stage and read the complete item pools. A list of possible alternatives does not mean one kill gives every listed item. Separate guaranteed progress, such as accumulated currency, from random rewards.
Avoid inefficient upgrades
Do not buy a weapon you cannot equip just because it is cheap. Solve your limiting problem: missed attacks, survival, mana/AG or damage. Keep enough Zen for the next session after spending on an upgrade.
Illustrated walkthrough
Compare sessions with Hunting Log
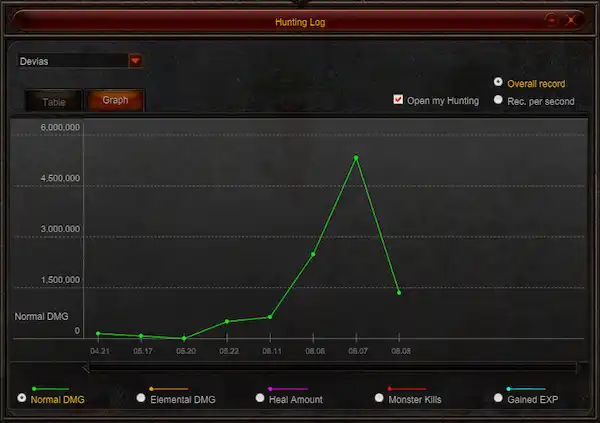
Select one metric and compare sessions of similar length. Example data are not expected results for your character.
Open Hunting Log through its button or the standard End shortcut. Use the table for recorded sessions and the graph for trends. Keep ordinary damage, elemental damage, recovery, kills and experience separate when deciding what changed.
Total damage rewards longer sessions. For an equipment comparison, use equal test durations or a per-second view when available. A larger total after a much longer run is not proof of a stronger build.
The log can also be shared through its visibility option. Leave sharing off if you do not want others to inspect the recorded information. Changing visibility does not change the effectiveness of your build.