On this page
Learn what each panel does before memorizing shortcuts. The visible menu buttons remain useful if your keyboard layout or client bindings differ.
Frequently used controls
| Default key | Purpose | Useful first check |
|---|---|---|
| C | Character information | Unspent points and combat values. |
| I or V | Inventory | Gear requirements, durability and free space. |
| M | Move list | Destination access and the displayed travel cost. |
| D | Interaction commands | Actions such as trade or party invitation. |
| Enter | Chat | Select the intended chat channel before sending. |
| K | Gremory Case | Rewards waiting to be claimed and their expiry. |
| Z | MU Helper settings | Attack, recovery and pickup settings. |
| Home | MU Helper start/stop | Confirm the intended skill and location first. |
These are standard MU bindings; use the client's menu/help when a key behaves differently. Close chat before testing gameplay shortcuts, since typing focus can consume the key.
Read your resource bars
HP represents your remaining life. MP supplies magic and many skills. AG is another resource used by certain attacks. SD is a separate combat shield associated especially with player combat. Running out of MP or AG can stop a hunting routine even while your HP remains full.
Inspect before clicking
Hover over equipment to read its class, level, stats and options. A higher item level does not override a class restriction. When opening a crafting or trading window, read the result, currency and confirmation text before accepting.
Travel and orientation
The move list can show destinations that still have requirements. Check your level, Zen and access conditions when a move fails. On arrival, note the map name and coordinates before leaving a safe area; coordinates only make sense together with their map.
Common interface problems
If shortcuts appear unresponsive, close chat and other focused input boxes. If a reward cannot be claimed, check the bag for enough contiguous empty space. If attacks suddenly stop, inspect MP, AG, durability and whether the selected skill is still usable.
Next: character stats and inventory management.
Illustrated walkthrough
Use the move window as a planning tool
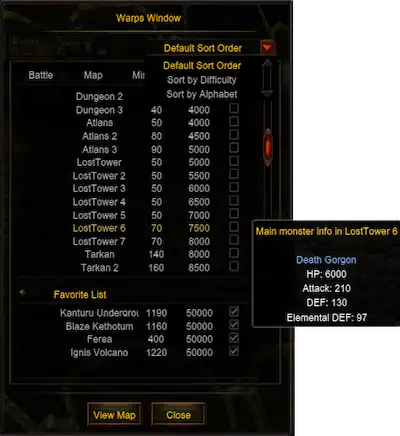
Example of the move interface. Map access levels, prices and monster statistics shown here are not a Velocity configuration table.
Open Move with M and check the destination before selecting it. The standard interface offers sorting and can show monster details when you hover over a hunting destination. Use this to identify the intended map; the displayed level and price still need to be satisfied.
If a destination is unavailable, check the named requirement instead of repeatedly clicking it. Meeting coordinates require both the map and channel: matching only the numbers is not enough to meet your party.
Separate chat from system feedback
Party, Guild, Whisper and System views serve different purposes. When diagnosing a failed move, purchase or item use, inspect System messages. If a shortcut types into chat, close the input first.